Automatically Clear History in Chrome: A Comprehensive Guide
In today’s digital age, online privacy is paramount. One crucial aspect of maintaining your privacy is managing your browsing history. Google Chrome, being one of the most popular web browsers, stores a record of your online activities. While this can be convenient for revisiting websites, it also poses a potential privacy risk. Learning how to automatically clear history Chrome can significantly enhance your online security and peace of mind.
This comprehensive guide will delve into various methods for automatically clearing your history in Chrome, ranging from built-in settings to third-party extensions and even system-level configurations. We’ll explore the pros and cons of each approach, helping you choose the solution that best fits your needs. Whether you’re a privacy-conscious individual or simply want to keep your browser running smoothly, understanding how to automatically clear history Chrome is essential.
Understanding the Importance of Clearing Your Browsing History
Before diving into the methods, let’s understand why automatically clearing your history in Chrome is so important.
- Privacy Protection: Your browsing history contains sensitive information about the websites you visit, the searches you make, and the forms you fill out. This data can be accessed by others who use your computer or, in some cases, by malicious actors. Automatically clearing history Chrome minimizes the risk of unauthorized access to this information.
- Improved Performance: Over time, your browsing history can accumulate, slowing down your browser’s performance. Clearing it regularly can help improve Chrome’s speed and responsiveness.
- Reduced Tracking: Websites often use cookies and other tracking technologies to monitor your online behavior. Clearing your browsing history, including cookies and cached data, can help reduce the effectiveness of these tracking efforts.
- Security: Clearing your browsing history can remove potentially harmful files or data that may have been downloaded from malicious websites.
Methods for Automatically Clearing History in Chrome
There are several ways to automatically clear history in Chrome. Let’s explore the most common and effective methods:
Using Chrome’s Built-in Settings
Chrome offers a built-in feature that allows you to clear your browsing history manually. While it doesn’t offer a true “automatic” clearing option, you can set it up to be a quick and easy process each time you close the browser.
- Access Chrome’s Settings: Click on the three vertical dots (Menu) in the top-right corner of Chrome and select “Settings.”
- Navigate to Privacy and Security: In the Settings menu, click on “Privacy and security” in the left-hand sidebar.
- Clear Browsing Data: Click on “Clear browsing data.”
- Configure the Settings: In the “Clear browsing data” dialog box, you can choose the time range (e.g., “Last hour,” “Last 24 hours,” “All time”) and the types of data you want to clear (e.g., “Browsing history,” “Cookies and other site data,” “Cached images and files”).
- Clear Data: Click on the “Clear data” button.
While this method requires manual intervention, familiarizing yourself with these settings is a good starting point. You can also create a bookmark to the “Clear browsing data” page for quicker access. It’s not automatically clearing history Chrome, but it’s a readily available option.
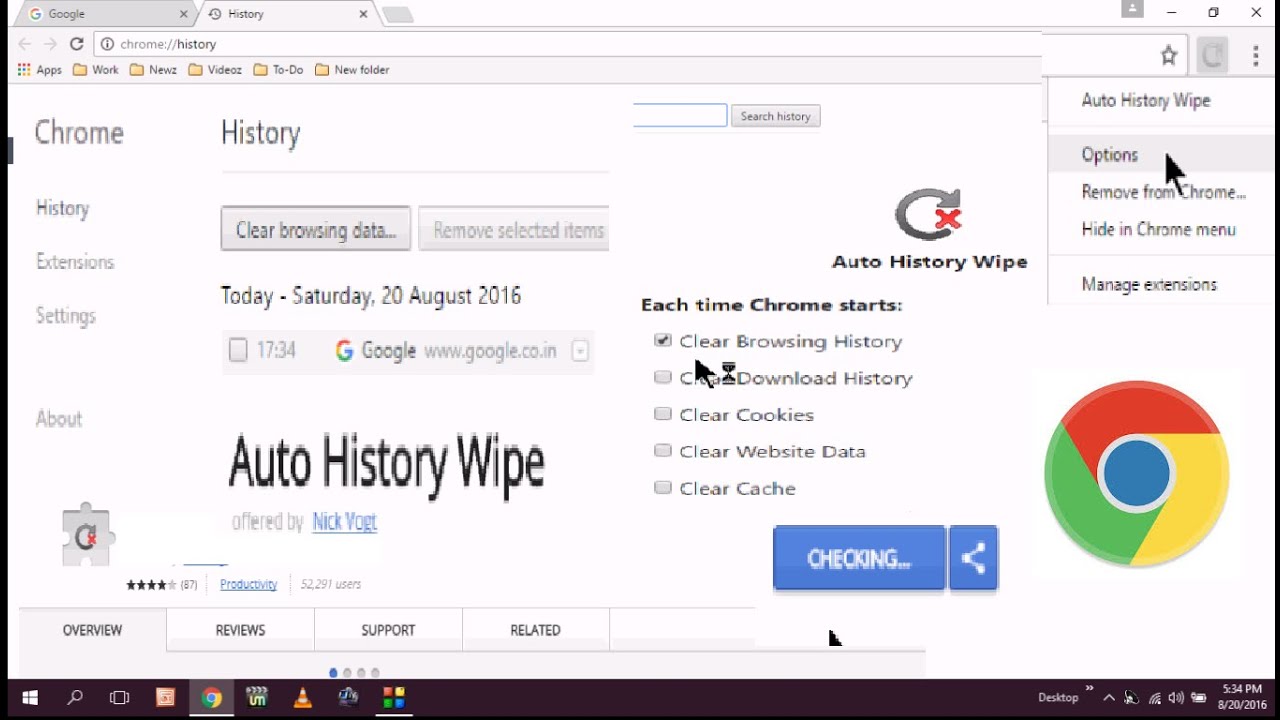
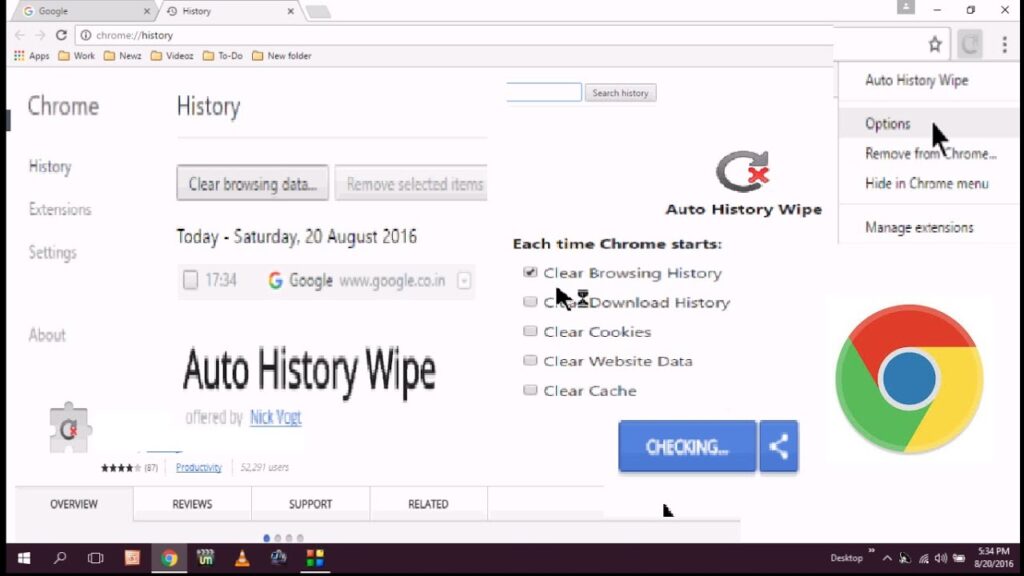
Using Chrome Extensions for Automatic History Clearing
Several Chrome extensions are designed to automatically clear history Chrome. These extensions offer more granular control and automation than Chrome’s built-in settings. Here are a few popular options:
- Click&Clean: This extension allows you to automatically clear your browsing history, cookies, cache, and other data when you close Chrome. You can customize the settings to clear specific types of data and exclude certain websites.
- History Auto Delete: As the name suggests, this extension focuses specifically on automatically deleting your browsing history. You can set a timer to clear your history at regular intervals.
- Clear Cache Automatically: While primarily focused on clearing the cache, this extension also offers options to clear your browsing history and cookies automatically.
How to Install and Use a Chrome Extension:
- Open the Chrome Web Store: Go to the Chrome Web Store (chrome.google.com/webstore).
- Search for an Extension: Search for an extension like “Click&Clean” or “History Auto Delete.”
- Add to Chrome: Click on the extension’s page and then click on the “Add to Chrome” button.
- Configure the Extension: Once installed, the extension will usually have an icon in the Chrome toolbar. Click on the icon to access the extension’s settings and configure it to automatically clear history Chrome according to your preferences.
Important Considerations When Using Extensions:
- Security: Only install extensions from reputable developers. Read reviews and check the extension’s permissions before installing it.
- Performance: Some extensions can impact Chrome’s performance. Monitor your browser’s speed and responsiveness after installing an extension.
- Privacy: Be aware that some extensions may collect your browsing data. Read the extension’s privacy policy carefully before installing it.
Configuring System-Level Settings (Advanced)
For advanced users, it’s possible to configure system-level settings to automatically clear history Chrome. This approach typically involves using scripts or scheduled tasks to clear the browser’s data files. However, this method requires technical expertise and is not recommended for novice users.
Example (Windows):
You could create a batch script that deletes the Chrome history files located in the user’s profile directory and then schedule it to run regularly using the Windows Task Scheduler.
Caution: Incorrectly configuring system-level settings can damage your system or compromise your data. Proceed with caution and only if you have a thorough understanding of the process.
Using Incognito Mode as a Preventive Measure
While not a direct method for automatically clearing history Chrome after the fact, using Incognito mode is an excellent preventive measure. When you browse in Incognito mode, Chrome doesn’t save your browsing history, cookies, site data, or information entered in forms. This means that when you close the Incognito window, your browsing activity is automatically erased.
How to Open Incognito Mode:
- Click on the three vertical dots (Menu) in the top-right corner of Chrome and select “New Incognito Window.”
- Alternatively, you can use the keyboard shortcut Ctrl+Shift+N (Windows) or Command+Shift+N (Mac).
Limitations of Incognito Mode:
- Your activity may still be visible to your employer, school, or internet service provider.
- Websites can still track your IP address.
Choosing the Right Method for You
The best method for automatically clearing history Chrome depends on your individual needs and preferences. Here’s a summary of the pros and cons of each approach:
| Method | Pros | Cons |
|---|---|---|
| Chrome’s Built-in Settings | Simple, readily available, no need to install extensions | Requires manual intervention, not truly automatic |
| Chrome Extensions | Highly customizable, offers true automation, granular control | Potential security and performance risks, requires careful selection |
| System-Level Settings | Maximum control, can be highly effective | Requires technical expertise, potential for system damage |
| Incognito Mode | Easy to use, prevents history from being saved in the first place | Not a true automatic clearing solution, limited privacy protection |
Best Practices for Maintaining Online Privacy
Automatically clearing history Chrome is just one piece of the puzzle when it comes to maintaining your online privacy. Here are some additional best practices:
- Use a strong password manager: A password manager can help you create and store strong, unique passwords for all of your online accounts.
- Enable two-factor authentication: Two-factor authentication adds an extra layer of security to your accounts by requiring a second verification method, such as a code sent to your phone.
- Use a VPN: A VPN (Virtual Private Network) encrypts your internet traffic and masks your IP address, making it more difficult for websites and third parties to track your online activity.
- Review your privacy settings: Regularly review the privacy settings on your social media accounts and other online services to ensure that your personal information is not being shared unnecessarily.
- Be cautious of phishing scams: Be wary of suspicious emails or websites that ask for your personal information.
- Keep your software up to date: Regularly update your operating system, browser, and other software to patch security vulnerabilities.
Conclusion
Automatically clearing history Chrome is a simple yet effective way to enhance your online privacy and security. By choosing the method that best suits your needs and following the best practices outlined in this guide, you can take control of your digital footprint and protect your personal information. Whether you opt for a Chrome extension, utilize Chrome’s built-in features, or employ a combination of strategies, remember that proactive privacy management is key in today’s interconnected world. It’s crucial to understand how to automatically clear history Chrome, but also to stay informed about emerging privacy threats and adapt your strategies accordingly. Remember to always prioritize your online safety and privacy.
[See also: How to Manage Cookies in Chrome for Enhanced Privacy]
[See also: The Ultimate Guide to Chrome Security Settings]
