How to Turn On Dark Mode on Word Doc: A Comprehensive Guide
In today’s digital age, staring at screens for extended periods is almost unavoidable. Whether you’re working on a crucial document, drafting a report, or simply reading, the bright white interface of applications like Microsoft Word can strain your eyes. Fortunately, Microsoft Word offers a solution: dark mode. This feature inverts the color scheme, displaying light text on a dark background, which can reduce eye strain, especially in low-light environments. This comprehensive guide will walk you through how to turn on dark mode on Word doc across various platforms, ensuring a comfortable and productive writing experience.
Why Use Dark Mode on Word?
Before diving into the how-to, let’s briefly discuss the benefits of using dark mode in Word documents. The primary advantage is reduced eye strain. The contrast between bright text and a dark background is less harsh on the eyes, especially when working in dimly lit rooms. This can lead to fewer headaches and improved focus. Additionally, some users find that dark mode helps them sleep better by reducing exposure to blue light, which can disrupt the body’s natural sleep cycle.
Turning On Dark Mode on Word for Windows
The process for enabling dark mode on Word for Windows is straightforward. Here’s a step-by-step guide:
- Open Microsoft Word: Launch the Word application on your Windows computer.
- Go to File: Click on the ‘File’ tab located in the top-left corner of the Word window.
- Select Account: In the backstage view, click on ‘Account’ in the left-hand menu.
- Choose Office Theme: Under the ‘Office Theme’ dropdown menu, select ‘Black’ or ‘Dark Gray’. The ‘Black’ theme offers a true black background, while ‘Dark Gray’ provides a slightly lighter alternative.
Once you select either ‘Black’ or ‘Dark Gray’, the entire Office suite, including Word, Excel, PowerPoint, and Outlook, will switch to dark mode. This applies to the application’s interface, but by default, the document itself remains white. If you want the document area to also be dark, follow the next set of instructions.
Turning On Dark Mode for the Document Area in Windows
To change the document’s background to dark, you’ll need to adjust Word’s settings:
- Go to File: Again, click on the ‘File’ tab.
- Select Options: In the backstage view, click on ‘Options’ at the bottom of the left-hand menu.
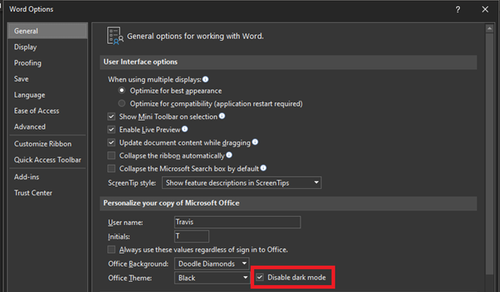
- Navigate to General: In the Word Options dialog box, ensure that ‘General’ is selected in the left-hand pane.
- Personalize your copy of Microsoft Office: Look for the ‘Personalize your copy of Microsoft Office’ section.
- Change the Office Theme: Make sure the Office Theme is set to either ‘Black’ or ‘Dark Gray’ (as explained previously).
- Check ‘Never change the document page color’: Uncheck the box that says “Never change the document page color”. If this is checked, the document will always appear white regardless of the theme.
- Click OK: Click ‘OK’ to save the changes.
After completing these steps, your Word document should now display with a dark background. If you prefer a different text color, you can customize it within the document itself.
Turning On Dark Mode on Word for macOS
Enabling dark mode on Word for macOS is similar to the Windows process, but with slight variations:
- Open Microsoft Word: Launch Word on your Mac.
- Go to Word > Preferences: In the menu bar at the top of the screen, click on ‘Word’ and then select ‘Preferences’.
- Select General: In the Word Preferences window, click on ‘General’.
- Choose Personalize: Find the “Personalize” section.
- Set Dark Mode: Under ‘Personalize’, click on the dropdown menu next to ‘Theme’ and select ‘Dark’.
This will switch the Word interface to dark mode. Like the Windows version, the document area might remain white. Here’s how to change that:
Turning On Dark Mode for the Document Area in macOS
- Follow the steps above to set the Theme to ‘Dark’.
- Go to the “Personalize” section.
- Ensure “Turn on Dark Mode in Word” is checked. If this is not checked, the document will always appear white regardless of the theme.
- Close the Preferences window: The changes will be applied automatically.
Turning On Dark Mode on Word Online (Web Version)
Using Word Online also offers a dark mode option, though it might not be as comprehensive as the desktop versions. Here’s how to enable it:
- Open Word Online: Access Word Online through your web browser by going to office.com and signing in with your Microsoft account.
- Open a Document: Open an existing document or create a new one.
- Go to View: Click on the ‘View’ tab in the ribbon.
- Select Dark Mode: In the ‘View’ tab, click on the ‘Dark Mode’ toggle. This will switch the document and the interface to dark mode.
Keep in mind that the dark mode feature in Word Online might be simpler than the desktop versions, and customization options might be limited.
Turning On Dark Mode on Word for Mobile (iOS and Android)
Microsoft Word is also available on mobile devices (iOS and Android), and it supports dark mode. The process is slightly different depending on your operating system:
iOS (iPhone/iPad)
- Open Microsoft Word: Launch the Word app on your iOS device.
- Tap on your profile icon: This is typically located in the top-left corner.
- Select Settings: In the menu that appears, tap on ‘Settings’.
- Choose Appearance: Under ‘Appearance’, you’ll find options for theme settings.
- Toggle Dark Mode: Switch the toggle to enable dark mode. You can also choose to ‘Use System Setting’, which will automatically switch between light and dark mode based on your device’s system-wide settings.
Android
- Open Microsoft Word: Launch the Word app on your Android device.
- Tap on the menu icon: This is usually represented by three horizontal lines in the top-left corner.
- Select Settings: In the menu that appears, tap on ‘Settings’.
- Choose Theme: Under ‘Theme’, you can select ‘Light’, ‘Dark’, or ‘System default’.
- Select Dark: Choose ‘Dark’ to enable dark mode. Like iOS, ‘System default’ will follow your device’s system-wide theme settings.
Customizing Dark Mode in Word
While dark mode offers a generally darker interface, you can further customize it to suit your preferences. This includes changing text colors, background colors, and highlighting colors. Here’s how:
Changing Text Colors
You can easily change the text color in a Word document regardless of whether dark mode is enabled. Simply select the text you want to modify, go to the ‘Home’ tab, and use the font color options to choose a color that provides good contrast against the dark background. Common choices include white, light gray, or a muted yellow.
Adjusting Page Color
While dark mode sets a default dark background, you might want to tweak it further. Go to the ‘Design’ tab, click on ‘Page Color’, and select a shade that you find comfortable. Experiment with different dark hues to find what works best for your eyes. Keep in mind that this changes the background color for printing as well, so consider saving a separate version if you need to print the document with a white background.
Highlighting Colors
Ensure that your highlighting colors are also visible and effective in dark mode. Choose lighter or brighter shades that stand out against the dark background. Test different highlighting colors to see which ones work best for you.
Troubleshooting Dark Mode Issues
Sometimes, dark mode might not work as expected. Here are some common issues and their solutions:
- Dark Mode Not Applying: Ensure that you have the latest version of Microsoft Word installed. Updates often include bug fixes and improvements related to dark mode functionality.
- Document Still Appears White: Double-check that you’ve unchecked the ‘Never change the document page color’ option in the Word settings (as described above).
- Inconsistent Theme Across Office Apps: Make sure that the Office Theme is consistently set to ‘Black’ or ‘Dark Gray’ across all Office applications.
- Graphics and Images Not Displaying Correctly: Some images or graphics might not display well in dark mode. You might need to adjust their settings or replace them with versions that are better suited for a dark background.
Conclusion
Enabling dark mode on a Word doc is a simple yet effective way to reduce eye strain and improve your overall writing experience. Whether you’re using Word on Windows, macOS, online, or on a mobile device, the steps outlined in this guide will help you switch to a more comfortable and eye-friendly interface. Experiment with the customization options to find the settings that work best for you, and enjoy a more productive and less straining writing session. Remember to keep your software updated to ensure you have access to the latest features and bug fixes related to dark mode. By following these instructions, you’ll be well on your way to mastering how to turn on dark mode on Word doc. [See also: How to Customize Microsoft Word for Maximum Productivity]
