How to Prevent Pop Ups on Google Chrome: A Comprehensive Guide
Pop-up ads, those often intrusive windows that appear unexpectedly while browsing the internet, can be incredibly annoying and disruptive. They can range from simple advertisements to malicious attempts to install malware. Fortunately, Google Chrome offers robust built-in features to block these unwanted pop ups, ensuring a smoother and safer browsing experience. This article provides a detailed, step-by-step guide on how to prevent pop ups on Google Chrome, covering various methods and advanced settings to customize your protection.
Understanding Pop Ups and Their Risks
Before diving into the solutions, it’s important to understand the different types of pop ups and the potential risks they pose. Pop ups aren’t always malicious; some websites use them legitimately for login screens, video players, or other necessary functions. However, many are used for aggressive advertising, phishing scams, or distributing malware.
- Advertising Pop Ups: These are the most common type, designed to promote products or services. While generally harmless, they can be distracting and consume bandwidth.
- Malicious Pop Ups: These are designed to trick users into downloading harmful software or revealing personal information. They may mimic system warnings or offer fake security scans.
- Tech Support Scams: These pop ups often display alarming messages about computer viruses or errors, urging users to call a fake tech support number.
By understanding these risks, you can better appreciate the importance of knowing how to prevent pop ups on Google Chrome.
Method 1: Using Chrome’s Built-in Pop-up Blocker
Google Chrome has a built-in pop-up blocker that is enabled by default. However, it’s essential to ensure it’s properly configured and to understand its limitations. Here’s how to access and configure Chrome’s pop-up blocker:
- Open Google Chrome: Launch the Chrome browser on your computer.
- Access Settings: Click on the three vertical dots (the “Customize and control Google Chrome” menu) in the upper-right corner of the browser window.
- Navigate to Privacy and Security: Scroll down and click on “Settings.” In the left-hand menu, select “Privacy and security.”
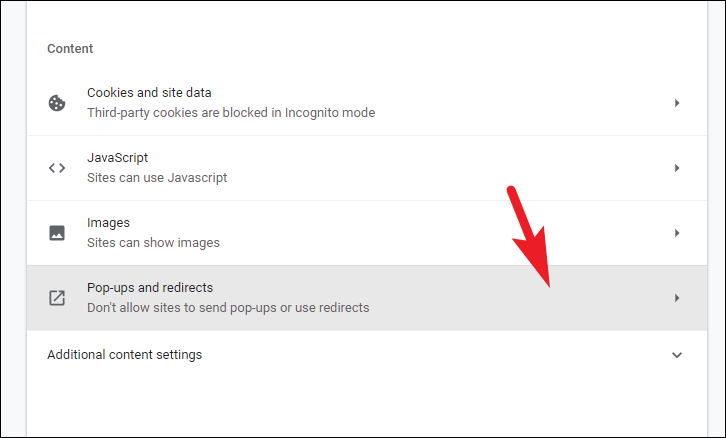
- Site Settings: Within the “Privacy and security” section, click on “Site Settings.”
- Pop-ups and redirects: Scroll down to find “Pop-ups and redirects” and click on it.
- Configure Blocking: Here, you have two options:
- Allowed: Sites listed here are permitted to show pop ups. You can remove sites from this list by clicking the three dots next to the site and selecting “Remove.”
- Blocked: This setting prevents most pop ups from appearing. Ensure the toggle is set to “Blocked (recommended).”
By default, Chrome blocks pop ups it deems intrusive. However, some websites might still be able to bypass this protection. If you’re still experiencing unwanted pop ups, continue to the next methods.
Method 2: Adding Exceptions for Trusted Sites
Sometimes, pop ups are necessary for the functionality of certain websites you trust. For example, a banking website might use a pop up for secure authentication. In such cases, you can add exceptions to Chrome’s pop-up blocker.
- Follow steps 1-5 from Method 1 to access the “Pop-ups and redirects” settings.
- Add Allowed Sites: In the “Allowed to send pop-ups and use redirects” section, click the “Add” button.
- Enter the Website URL: Type the URL of the website you want to allow pop ups from and click “Add.”
Remember to only add trusted websites to this list. Adding untrustworthy sites can expose you to potentially harmful pop ups. You can always remove sites from the allowed list if you no longer want them to display pop ups.
Method 3: Using Ad Blockers and Extensions
Ad blockers are browser extensions that can block various types of ads, including pop ups. They offer a more comprehensive solution than Chrome’s built-in blocker, as they can also block banner ads, video ads, and other intrusive content. Several reputable ad blockers are available for Chrome:
- AdBlock: A popular and widely used ad blocker that effectively blocks most types of ads.
- Adblock Plus: Another well-known ad blocker that allows you to whitelist specific websites if needed.
- uBlock Origin: A lightweight and efficient ad blocker that consumes fewer resources than other options.
To install an ad blocker:
- Open the Chrome Web Store: Go to chrome.google.com/webstore.
- Search for an Ad Blocker: Type the name of the ad blocker (e.g., “AdBlock”) in the search bar.
- Install the Extension: Click on the ad blocker you want to install and then click “Add to Chrome.”
- Confirm Installation: A pop-up window will appear asking for confirmation. Click “Add extension.”
Once installed, the ad blocker will automatically block most pop ups and other ads while you browse the internet. You can usually customize the ad blocker’s settings to suit your preferences. [See also: Best Chrome Extensions for Productivity]
Method 4: Disabling Notifications
Sometimes, websites use browser notifications to send you messages, which can appear as pop ups. While these notifications can be useful, they can also become intrusive if too many websites request permission to send them. You can manage and disable these notifications in Chrome’s settings.
- Follow steps 1-3 from Method 1 to access the “Site Settings” section.
- Notifications: Scroll down and click on “Notifications.”
- Configure Notifications: Here, you have several options:
- Sites can ask to send notifications: This is the default setting. If you want to block all notification requests, toggle this off.
- Allowed to send notifications: This section lists websites that you have allowed to send notifications. You can remove sites from this list by clicking the three dots next to the site and selecting “Remove.”
- Blocked to send notifications: This section lists websites that you have blocked from sending notifications. You can add sites to this list by clicking the “Add” button and entering the website URL.
By managing your notification settings, you can significantly reduce the number of unwanted pop ups you encounter. It is an important part of knowing how to prevent pop ups on Google Chrome.
Method 5: Resetting Chrome Settings
If you’re still experiencing persistent pop ups despite trying the above methods, it’s possible that your Chrome settings have been altered by malware or unwanted extensions. Resetting Chrome to its default settings can often resolve these issues.
Warning: Resetting Chrome will remove your saved bookmarks, history, passwords, and other data. Be sure to back up any important information before proceeding.
- Open Google Chrome: Launch the Chrome browser on your computer.
- Access Settings: Click on the three vertical dots in the upper-right corner of the browser window.
- Navigate to Advanced Settings: Scroll down and click on “Settings.” In the left-hand menu, select “Advanced.”
- Reset and clean up: Scroll down and click on “Reset and clean up”.
- Restore settings to their original defaults: Click on “Restore settings to their original defaults”.
- Confirm Reset: A pop-up window will appear asking for confirmation. Click “Reset settings.”
After resetting Chrome, you’ll need to reconfigure your settings and reinstall any extensions you want to use. This can be a drastic measure, but it can be effective in eliminating stubborn pop ups.
Method 6: Scanning for Malware
In some cases, pop ups can be caused by malware installed on your computer. Malware can alter your browser settings and display unwanted ads, even if you have pop-up blockers enabled. Running a malware scan can help identify and remove these threats.
Several reputable antivirus and anti-malware programs are available, including:
- Malwarebytes: A popular anti-malware program that can detect and remove a wide range of threats.
- Norton AntiVirus: A comprehensive antivirus solution that offers real-time protection against malware.
- Bitdefender: Another top-rated antivirus program that provides excellent protection against various types of malware.
To run a malware scan:
- Download and Install an Anti-Malware Program: Choose a reputable anti-malware program and download it from the official website.
- Run a Scan: Launch the program and initiate a full system scan.
- Remove Threats: Follow the program’s instructions to remove any detected malware.
Regularly scanning your computer for malware is an essential part of maintaining a safe and secure browsing experience. This will help prevent pop ups on Google Chrome caused by malicious software.
Conclusion: Mastering Pop-up Prevention in Chrome
Effectively preventing pop ups on Google Chrome requires a combination of strategies, from utilizing Chrome’s built-in features to employing ad blockers and malware scanners. By following the methods outlined in this guide, you can significantly reduce the number of unwanted pop ups you encounter and enjoy a cleaner, safer, and more productive browsing experience. Remember to regularly review your settings and update your security software to stay protected against emerging threats. Understanding how to prevent pop ups on Google Chrome is crucial for maintaining a positive online experience.
