
How to See Past Broadcasts on Twitch: A Comprehensive Guide
Twitch, the leading live streaming platform for gamers and content creators, offers a vast library of past broadcasts, also known as VODs (Videos on Demand). These recordings allow viewers to catch up on streams they missed, revisit memorable moments, or analyze a streamer’s gameplay. Understanding how to see past broadcasts on Twitch is essential for both viewers and streamers alike. This guide will walk you through the process, covering everything from enabling archiving to finding specific content.
Enabling Archiving on Twitch
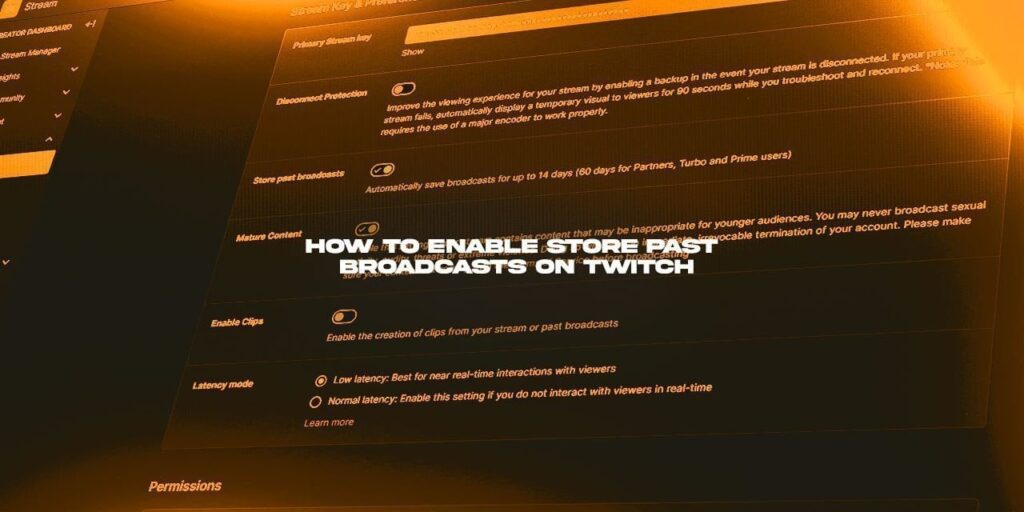
Before you can see past broadcasts on Twitch, the streamer must enable archiving. This feature automatically saves streams after they end. If archiving isn’t enabled, the broadcast will disappear once the streamer goes offline. Here’s how streamers can enable archiving:
- Log in to Twitch: Go to Twitch.tv and log in to your account.
- Access Creator Dashboard: Click on your profile icon in the top right corner and select “Creator Dashboard.”
- Navigate to Settings: In the Creator Dashboard, go to “Settings” and then “Stream.”
- Enable Store Past Broadcasts: Scroll down to the “VOD Settings” section and toggle the “Store past broadcasts” option to ON.
By enabling this setting, all future streams will be automatically archived for a limited time, typically 14 days for regular users and 60 days for Twitch Partners and Affiliates.
Finding Past Broadcasts on Twitch
Once archiving is enabled, finding past broadcasts on Twitch is straightforward. There are several ways to access VODs, depending on whether you’re the streamer or a viewer.
As a Streamer:
- Via Creator Dashboard:
- Go to your Creator Dashboard.
- Click on “Content” and then “Video Producer.”
- Here, you’ll find a list of all your past broadcasts, along with options to edit, download, or delete them.
- Via Your Channel Page:
- Go to your channel page (e.g., twitch.tv/yourusername).
- Click on the “Videos” tab.
- You’ll see a list of your past broadcasts, highlights, and uploads.
As a Viewer:
- Via the Channel Page:
- Go to the streamer’s channel page (e.g., twitch.tv/streamername).
- Click on the “Videos” tab.
- If the streamer has enabled archiving, you’ll see a list of their past broadcasts, highlights, and uploads.
- Using the Twitch Search Function:
- Use the search bar at the top of the Twitch website.
- Type in keywords related to the stream you’re looking for (e.g., game title, streamer name, specific event).
- Filter the results by “Videos” to narrow down your search.
Understanding VOD Availability and Storage
It’s crucial to understand that Twitch only stores past broadcasts for a limited time. As mentioned earlier, regular users have their VODs stored for 14 days, while Twitch Partners and Affiliates get 60 days. After this period, the VODs are automatically deleted from Twitch’s servers.
To preserve your content, streamers should download their VODs and upload them to other platforms like YouTube or create highlights within Twitch. Highlights are shorter clips extracted from the full broadcast and can be stored indefinitely on Twitch.
Creating Highlights from Past Broadcasts
Creating highlights is a great way to showcase the best moments from your streams and keep them available for your audience. Here’s how to create highlights:
- Go to the Video Producer: Access your Video Producer from the Creator Dashboard.
- Select the VOD: Choose the past broadcast you want to create a highlight from.
- Click on “Highlight”: Click the “Highlight” button next to the VOD.
- Edit the Highlight: Use the editing tools to select the start and end points of your highlight. You can create multiple highlights from a single VOD.
- Add Title and Description: Give your highlight a descriptive title and add a brief description.
- Publish: Click “Create Highlight” to publish your highlight.
Highlights will appear on your channel page under the “Videos” tab, alongside your past broadcasts and uploads.
Downloading Past Broadcasts
Streamers who want to keep their content indefinitely should download their past broadcasts. Here’s how:
- Go to the Video Producer: Access your Video Producer from the Creator Dashboard.
- Select the VOD: Choose the past broadcast you want to download.
- Click on “Download”: Click the three vertical dots next to the VOD and select “Download.”
The VOD will be downloaded to your computer in MP4 format. You can then upload it to other platforms or store it locally.
Troubleshooting Issues with Past Broadcasts
Sometimes, you may encounter issues when trying to see past broadcasts on Twitch. Here are some common problems and their solutions:
- VOD Not Available:
- Check Archiving Settings: Ensure the streamer has enabled the “Store past broadcasts” option in their settings.
- Check Storage Duration: Remember that VODs are only stored for a limited time (14 days for regular users, 60 days for Partners and Affiliates).
- Contact the Streamer: If you’re still unable to find the VOD, contact the streamer to confirm if it was archived and if it’s still available.
- Playback Issues:
- Check Your Internet Connection: Ensure you have a stable internet connection.
- Clear Your Browser Cache: Clear your browser’s cache and cookies.
- Try a Different Browser: Try accessing the VOD using a different web browser.
- Update Your Browser: Make sure your browser is up to date.
Tips for Streamers to Maximize VOD Usage
For streamers, effectively managing and utilizing past broadcasts is crucial for audience engagement and content strategy. Here are some tips:
- Always Enable Archiving: Make sure the “Store past broadcasts” option is always enabled to capture all your streams.
- Create Engaging Highlights: Regularly create highlights of the best moments from your streams to keep your audience engaged.
- Promote Your VODs: Share links to your past broadcasts and highlights on social media and other platforms.
- Repurpose Content: Use your VODs to create shorter videos for YouTube or other platforms.
- Analyze VOD Performance: Use Twitch’s analytics to track the performance of your VODs and identify which content resonates with your audience.
- Use Chapters and Markers: Utilize Twitch’s chapter markers to allow viewers to easily navigate through your longer VODs.
The Future of VODs on Twitch
Twitch is continuously evolving, and the platform is always looking for ways to improve the VOD experience. Expect to see more features and tools in the future that make it easier to find, watch, and share past broadcasts. This includes improved search functionality, better editing tools, and more options for content creators to manage their VOD library.
Conclusion
Knowing how to see past broadcasts on Twitch is essential for both viewers and streamers. By enabling archiving, creating highlights, and understanding the storage limitations, you can make the most of Twitch’s VOD feature. Whether you’re catching up on a missed stream or repurposing content for other platforms, past broadcasts offer a valuable resource for the Twitch community. Remember to always check the streamer’s archiving settings and be mindful of the storage duration to avoid missing out on your favorite content. Understanding how to see past broadcasts on Twitch empowers viewers to engage more deeply with their favorite streamers and allows streamers to extend the reach of their content beyond the live stream.
By following the steps outlined in this guide, you’ll be well-equipped to navigate the world of Twitch VODs and enjoy all the benefits they have to offer. Whether you’re a seasoned streamer or a casual viewer, mastering how to see past broadcasts on Twitch is a valuable skill in the ever-evolving landscape of online streaming.
[See also: Twitch Streaming Guide for Beginners]
[See also: How to Grow Your Twitch Channel]
[See also: Best Twitch Extensions for Streamers]
