Awesome Screenshot Capture Chrome: The Ultimate Guide to Efficient Screen Grabs
In today’s fast-paced digital world, the ability to quickly and efficiently capture screenshots is more crucial than ever. Whether you’re creating tutorials, documenting bugs, sharing information, or simply saving a visual record, having the right screenshot tool can significantly boost your productivity. Among the plethora of options available, the Awesome Screenshot Capture Chrome extension stands out as a versatile and powerful solution. This guide delves into the intricacies of using Awesome Screenshot Capture Chrome, exploring its features, benefits, and how it can streamline your workflow.
Why Choose Awesome Screenshot Capture Chrome?
The Chrome Web Store is saturated with screenshot extensions, so what makes Awesome Screenshot Capture Chrome a superior choice? It boils down to a combination of functionality, ease of use, and a robust feature set that caters to both casual users and seasoned professionals.
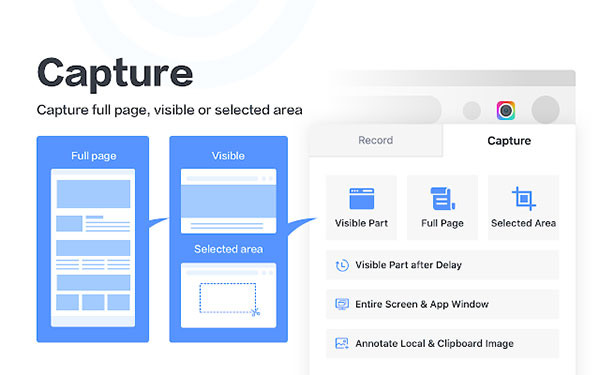
- Comprehensive Capture Options: From capturing the entire page to selecting a specific area, Awesome Screenshot Capture Chrome offers a range of capture modes to suit different needs.
- Annotation Tools: After capturing a screenshot, you can annotate it with arrows, text, shapes, and more, making it easy to highlight key information.
- Scrolling Capture: Need to capture an entire webpage, even the parts that aren’t visible on the screen? The scrolling capture feature allows you to do just that.
- Easy Editing: The built-in editor lets you crop, blur, and make other adjustments to your screenshots before saving or sharing them.
- Cloud Integration: Seamlessly upload and share your screenshots via cloud services like Google Drive and Dropbox.
Getting Started with Awesome Screenshot Capture Chrome
Installing and setting up Awesome Screenshot Capture Chrome is a breeze. Here’s a step-by-step guide:
- Install the Extension: Open the Chrome Web Store and search for “Awesome Screenshot Capture Chrome.” Click “Add to Chrome” and confirm the installation.
- Pin the Extension: For easy access, pin the extension to your Chrome toolbar by clicking the puzzle icon and then the pin icon next to Awesome Screenshot Capture Chrome.
- Grant Permissions: The first time you use the extension, you may be prompted to grant certain permissions. Allow the necessary permissions for the extension to function correctly.
Exploring the Capture Modes
One of the strengths of Awesome Screenshot Capture Chrome is its variety of capture modes. Let’s take a closer look at each one:
Capture Entire Page
This mode captures the entire webpage, including content that is not visible on your screen. This is particularly useful for capturing long articles, infographics, or any other content that spans multiple screen lengths. To use this mode, simply click the extension icon and select “Capture Entire Page.” The extension will automatically scroll through the page and capture all the content.
Capture Selected Area
If you only need to capture a specific portion of the screen, the “Capture Selected Area” mode is your go-to option. Click the extension icon and select “Capture Selected Area.” Then, click and drag your mouse to select the area you want to capture. Once you release the mouse button, the selected area will be captured.
Capture Visible Part
This mode captures only the part of the webpage that is currently visible on your screen. This is a quick and easy way to grab a snapshot of what you’re currently viewing. Select “Capture Visible Part” from the extension menu to use this option.
Capture Desktop
Need to capture something outside of your Chrome browser? The “Capture Desktop” mode allows you to capture your entire desktop screen. This is useful for creating tutorials or sharing information from other applications. Select “Capture Desktop” to use this feature.
Capture Specific Area of Desktop
Similar to capturing a selected area within Chrome, this allows you to select a specific area of your desktop to capture. Great for isolating parts of applications or your desktop environment.
Annotating and Editing Screenshots
After capturing a screenshot with Awesome Screenshot Capture Chrome, you’ll be taken to the built-in editor, where you can annotate and edit your image. The editor provides a range of tools to help you highlight key information and make your screenshots more effective.
Annotation Tools
- Arrows: Use arrows to point out specific areas or elements in your screenshot. You can customize the color, size, and style of the arrows.
- Text: Add text to your screenshot to provide additional context or explanations. You can choose from a variety of fonts, sizes, and colors.
- Shapes: Draw rectangles, circles, and other shapes to highlight specific areas or create visual emphasis.
- Blur: Blur sensitive information, such as passwords or personal details, to protect your privacy.
- Lines: Draw freehand lines to underline, circle, or otherwise emphasize elements in your screenshot.
Editing Tools
- Crop: Crop your screenshot to remove unnecessary areas and focus on the most important content.
- Resize: Resize your screenshot to fit specific dimensions or reduce the file size.
- Undo/Redo: Easily undo or redo your actions if you make a mistake.
Saving and Sharing Screenshots
Once you’ve finished annotating and editing your screenshot, you can save it to your computer or share it online. Awesome Screenshot Capture Chrome offers several options for saving and sharing your images.
Saving Options
- Save to Local Drive: Save your screenshot as a PNG, JPG, or other image format to your computer.
- Copy to Clipboard: Copy the screenshot to your clipboard for easy pasting into other applications.
Sharing Options
- Upload to Awesome Screenshot: Upload your screenshot to the Awesome Screenshot website for easy sharing via a unique URL.
- Google Drive Integration: Save your screenshot directly to your Google Drive account.
- Dropbox Integration: Save your screenshot directly to your Dropbox account.
Advanced Tips and Tricks for Awesome Screenshot Capture Chrome
To maximize your efficiency with Awesome Screenshot Capture Chrome, consider these advanced tips and tricks:
- Keyboard Shortcuts: Learn the keyboard shortcuts for common actions, such as capturing the entire page or selecting an area. This can significantly speed up your workflow.
- Customization Options: Explore the extension’s settings to customize the capture behavior, annotation tools, and other options to suit your preferences.
- Troubleshooting: If you encounter any issues, consult the extension’s documentation or online forums for troubleshooting tips.
Alternatives to Awesome Screenshot Capture Chrome
While Awesome Screenshot Capture Chrome is a fantastic tool, it’s always good to be aware of alternative options. Here are a few other popular screenshot extensions for Chrome:
- Lightshot: A simple and lightweight extension with basic capture and annotation features.
- Nimbus Capture: A more advanced extension with screen recording capabilities and other advanced features.
- Fireshot: Another popular option with a wide range of capture and editing tools.
Conclusion
Awesome Screenshot Capture Chrome is a powerful and versatile tool that can significantly enhance your productivity. With its comprehensive capture options, annotation tools, and easy-to-use interface, it’s a must-have extension for anyone who regularly takes screenshots. Whether you’re creating tutorials, documenting bugs, or simply sharing information, Awesome Screenshot Capture Chrome is an invaluable asset.
By following the tips and techniques outlined in this guide, you can unlock the full potential of Awesome Screenshot Capture Chrome and streamline your workflow. So, go ahead and install the extension today and start capturing awesome screenshots!
[See also: How to Choose the Best Chrome Extension for Your Needs]
[See also: Top Productivity Tools for Remote Workers]
[See also: The Ultimate Guide to Chrome Extensions]
