
Creating Your Own: A Guide to Luffy Wanted Poster Drawing
The world of One Piece is filled with iconic imagery, and few are as recognizable as the various wanted posters that plaster the Grand Line. Among these, Monkey D. Luffy’s wanted poster stands out, not just for its increasing bounty but also for its simple yet effective design. For fans eager to express their love for the Straw Hat captain, a Luffy wanted poster drawing is a fantastic project. This guide will walk you through creating your own, covering everything from gathering reference images to adding the final touches.
Understanding the Luffy Wanted Poster
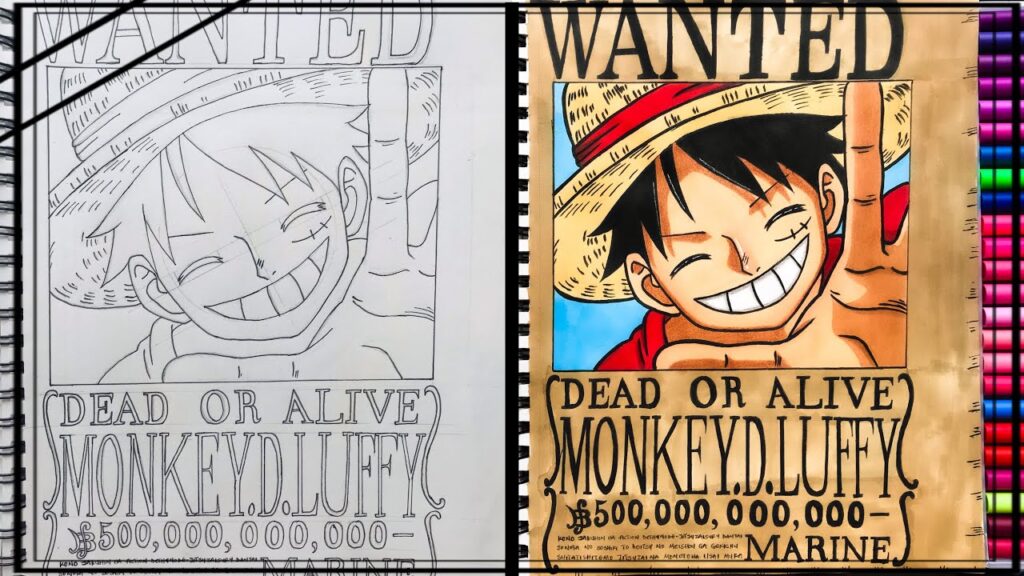
Before diving into the Luffy wanted poster drawing process, it’s essential to understand the elements that make it so iconic. The poster features a clear image of Luffy, usually captured in a dynamic pose. The background is typically a simple, aged paper texture, and of course, the bounty is prominently displayed. Key elements include:
- The Image: Usually a photograph, though in some instances, it’s a drawing. Early posters used a less flattering image, while later ones feature him in more heroic stances.
- The Background: A worn, parchment-like texture adds to the authenticity.
- The Bounty: A large, easily readable number indicating Luffy’s current bounty.
- The World Government Seal: A subtle but important detail that reinforces the poster’s official nature.
- The Text: Includes the name “Monkey D. Luffy” and the words “WANTED DEAD OR ALIVE.”
Gathering Your Materials for the Luffy Wanted Poster Drawing
To begin your Luffy wanted poster drawing, you’ll need to gather the necessary materials. The exact materials will depend on your preferred drawing style, but here are some suggestions:
- Paper: Choose a paper that suits your drawing style. For pencil drawings, a smooth drawing paper is ideal. For digital art, any digital canvas will work. Consider using tea-stained paper for a vintage look.
- Pencils/Pens: Use a range of pencils (e.g., HB, 2B, 4B) for sketching and shading. Alternatively, use fine-liner pens for a cleaner, more graphic style.
- Eraser: A kneaded eraser is excellent for lifting graphite without damaging the paper.
- Reference Images: Gather several reference images of Luffy from the anime or manga, particularly his wanted poster.
- Optional: Rulers, compasses, and tracing paper can be helpful for achieving accurate proportions and details.
Step-by-Step Guide to Drawing Luffy’s Wanted Poster
Follow these steps to create your own Luffy wanted poster drawing:
Step 1: Sketching the Basic Outline
Start by lightly sketching the basic outline of Luffy’s pose. Focus on capturing the overall shape and proportions. Use your reference images to guide you. Don’t worry about details at this stage; the goal is to establish the foundation of your drawing. Consider the perspective – is Luffy facing forward, in profile, or at an angle? This will affect the composition of your Luffy wanted poster drawing.
Step 2: Adding Details to the Luffy Wanted Poster Drawing
Once you’re happy with the outline, begin adding details. Focus on Luffy’s facial features, his straw hat, and his clothing. Pay attention to the folds and wrinkles in his clothes to add depth and realism. This is where your reference images will be invaluable. Remember, the goal is to create a recognizable likeness of Luffy for your Luffy wanted poster drawing.
Step 3: Inking the Line Art
If you’re using pens, carefully ink over your pencil lines. Use different pen thicknesses to create variation and emphasis. Thicker lines can be used for outlines and areas of shadow, while thinner lines can be used for details. If you’re sticking with pencils, you can skip this step and simply darken your lines. Consider using a sepia-toned ink for a more aged look for your Luffy wanted poster drawing.
Step 4: Shading and Adding Depth
Shading is crucial for adding depth and dimension to your Luffy wanted poster drawing. Use hatching, cross-hatching, or stippling techniques to create shadows and highlights. Pay attention to the direction of the light source and how it affects the shapes and forms of Luffy’s body and clothing. A good understanding of light and shadow will make your drawing more realistic and visually appealing.
Step 5: Creating the Background Texture
To create the aged paper texture, you can use several techniques. One method is to lightly shade the background with a pencil and then use a kneaded eraser to lift some of the graphite, creating a mottled effect. Another option is to use a texture brush in digital art software. You can also physically distress the paper by crumpling it slightly or applying tea stains. The background texture is a crucial element of the Luffy wanted poster drawing, so take your time and experiment with different techniques.
Step 6: Adding the Text and Bounty
Use a ruler and a fine-liner pen to add the text “WANTED DEAD OR ALIVE” and Luffy’s name. Pay attention to the font and spacing used in the original wanted poster. The bounty should be the most prominent text element. Research Luffy’s current bounty (which changes throughout the series) to ensure accuracy. This is a key element making it a proper Luffy wanted poster drawing. Ensure the text is clear and legible.
Step 7: Adding the World Government Seal
The World Government seal is a subtle but important detail. Find a reference image of the seal and carefully draw it in the corner of the poster. This adds to the authenticity of your Luffy wanted poster drawing. While small, this detail elevates the entire piece.
Step 8: Final Touches and Refinements
Take a step back and assess your Luffy wanted poster drawing. Make any necessary refinements to the lines, shading, and text. Ensure that the overall composition is balanced and visually appealing. If you’re using digital art software, you can adjust the colors and contrast to enhance the final result. Consider adding subtle details, such as small tears or wrinkles in the paper, to further enhance the aged look.
Tips for Creating an Authentic-Looking Luffy Wanted Poster
- Use High-Quality Reference Images: The better your reference images, the more accurate your drawing will be.
- Pay Attention to Detail: The small details can make a big difference in the overall look and feel of your poster.
- Experiment with Different Techniques: Don’t be afraid to try new things and find what works best for you.
- Don’t Be Afraid to Make Mistakes: Mistakes are a part of the learning process. Use them as an opportunity to improve your skills.
- Consider the Era: Luffy’s wanted poster changes throughout the series. Consider the specific aesthetic you’re aiming for and adjust accordingly for your Luffy wanted poster drawing.
Digital vs. Traditional Luffy Wanted Poster Drawing
The choice between digital and traditional art depends on your personal preferences and skill set. Digital art offers greater flexibility and control, allowing you to easily correct mistakes and experiment with different techniques. Traditional art, on the other hand, offers a more tactile and hands-on experience. Both mediums can produce stunning results, so choose the one that you feel most comfortable with for your Luffy wanted poster drawing.
Beyond the Basics: Adding Your Own Flair
While accuracy is important, don’t be afraid to add your own creative flair to your Luffy wanted poster drawing. You could try drawing Luffy in a different pose, adding a unique background, or incorporating elements from other One Piece characters. The possibilities are endless. The most important thing is to have fun and express your love for the series. You could even create wanted posters for other characters, expanding your artistic horizons.
Conclusion
Creating a Luffy wanted poster drawing is a fun and rewarding project for any One Piece fan. By following these steps and tips, you can create your own authentic-looking poster that captures the spirit of the series. Whether you choose to create a traditional drawing or a digital artwork, the process is sure to be enjoyable and educational. So grab your pencils or stylus and start creating your own piece of One Piece history. Remember to have fun and let your creativity shine through. Consider framing your finished piece to proudly display your artistic achievement. The world of One Piece awaits your artistic interpretation, starting with your very own Luffy wanted poster drawing.
[See also: One Piece Fan Art Guide]
[See also: Drawing Anime Characters Step-by-Step]
