
Creating Your Own Luffy Wanted Poster Drawing: A Step-by-Step Guide
The world of One Piece is filled with iconic imagery, and few things are as recognizable as the Straw Hat Pirates’ wanted posters. Among them, Monkey D. Luffy’s wanted poster stands out, not just for its high bounty, but also for its instantly recognizable design. If you’re a fan looking to express your artistic side, creating your own Luffy wanted poster drawing is a fantastic project. This guide will walk you through the process, from gathering your materials to adding the finishing touches, ensuring your Luffy wanted poster drawing captures the spirit of the original.
Gathering Your Materials
Before you start drawing your Luffy wanted poster drawing, you’ll need to gather the necessary materials. This includes:
- Drawing paper (A4 or larger recommended)
- Pencils (HB for sketching, 2B or darker for outlining)
- Eraser
- Ruler
- Black marker or fine-liner pen
- Colored pencils, markers, or paint (optional, for adding color)
- Reference images of Luffy’s wanted poster
Having a good set of references is crucial for accurately replicating the details of the Luffy wanted poster drawing. Search online for high-resolution images of the official poster to use as your guide.
Sketching the Basic Outline
Start by lightly sketching the basic outline of the poster. Use your ruler to create a rectangular frame that will serve as the border. Within this frame, sketch a larger rectangle that will contain Luffy’s portrait. Remember to keep your lines light and erasable, as this is just a preliminary sketch.
Next, sketch Luffy’s head and shoulders within the designated area. Pay close attention to the proportions and angles. Focus on capturing his characteristic grin and straw hat. Don’t worry about adding details at this stage; focus on getting the overall shape right for your Luffy wanted poster drawing.
Adding Details to Luffy’s Portrait
Once you’re satisfied with the basic outline, start adding details to Luffy’s portrait. This includes:
- Defining the shape of his eyes, nose, and mouth
- Adding details to his straw hat, such as the texture and the red band
- Drawing his neck and shoulders, including the details of his shirt
- Adding shading to give the portrait depth and dimension
Refer to your reference images frequently to ensure accuracy. Pay attention to the small details, as they can make a big difference in the overall look of your Luffy wanted poster drawing.
Creating the Wanted Poster Text and Design
After completing Luffy’s portrait, it’s time to add the text and design elements that make the poster instantly recognizable. This includes:
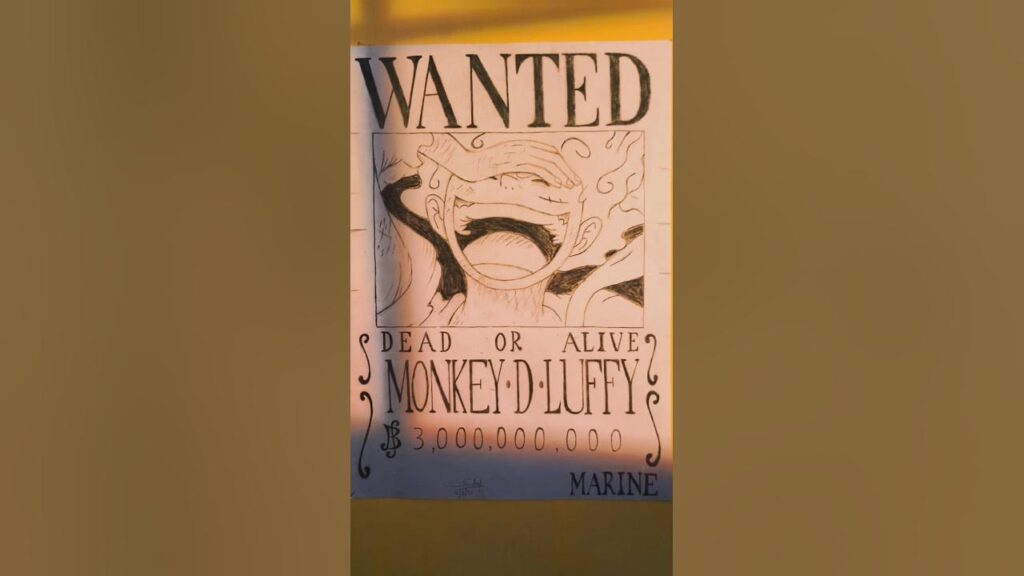
- The word “WANTED” in large, bold letters at the top of the poster
- Luffy’s full name: “Monkey D. Luffy”
- The bounty amount (current bounty is 3,000,000,000 Berries)
- The World Government seal
Use your ruler to ensure that the text is aligned and evenly spaced. You can either draw the World Government seal freehand or print out a template and trace it onto your poster. The lettering is a crucial part of the Luffy wanted poster drawing aesthetic.
Outlining and Inking
Once you’re happy with the sketch, it’s time to outline it with a black marker or fine-liner pen. Carefully trace over your pencil lines, making sure to create clean, crisp outlines. Vary the thickness of your lines to add depth and visual interest to your Luffy wanted poster drawing. For example, you can use thicker lines for the outlines of Luffy’s face and hat, and thinner lines for the details of his clothing.
After outlining, erase any remaining pencil lines to create a clean, professional-looking finished product. This step is essential for achieving a polished Luffy wanted poster drawing.
Adding Color (Optional)
While the original Luffy wanted poster is black and white, you can add color to your drawing if you choose. Use colored pencils, markers, or paint to add color to Luffy’s portrait, clothing, and hat. You can also add color to the background to create a more visually appealing poster. When adding color, try to emulate the style of the One Piece anime or manga to maintain consistency with the source material. Consider using cel-shading techniques to mimic the anime’s look. This is especially important for a vibrant Luffy wanted poster drawing.
Adding Aging Effects (Optional)
To give your Luffy wanted poster drawing a more authentic look, you can add aging effects. This can be done by:
- Gently crumpling the paper to create creases and wrinkles
- Using tea or coffee to stain the paper and give it a yellowish tint
- Tearing the edges of the poster to create a distressed look
Be careful not to overdo the aging effects, as you don’t want to damage your drawing. The goal is to make the poster look like it’s been hanging on a wall for a long time, not like it’s been through a war. These aging techniques can really elevate your Luffy wanted poster drawing.
Tips for Creating a Great Luffy Wanted Poster Drawing
Here are some additional tips to help you create a great Luffy wanted poster drawing:
- Use high-quality materials: Investing in good-quality drawing paper, pencils, and markers will make a big difference in the final result.
- Take your time: Don’t rush the process. Take your time to sketch, outline, and add details to your drawing.
- Practice makes perfect: The more you practice, the better you’ll become at drawing. Don’t be discouraged if your first attempt isn’t perfect. Keep practicing, and you’ll eventually create a Luffy wanted poster drawing that you’re proud of.
- Don’t be afraid to experiment: Try different techniques and styles to find what works best for you.
- Have fun: Drawing should be an enjoyable experience. Relax, have fun, and let your creativity flow.
Where to Display Your Luffy Wanted Poster Drawing
Once you’ve completed your Luffy wanted poster drawing, you’ll want to display it somewhere where you can show it off to your friends and fellow One Piece fans. Here are some ideas:
- Frame it and hang it on your wall
- Use it as a decoration for your desk or bookshelf
- Give it as a gift to a fellow One Piece fan
- Use it as a prop for cosplay or costume parties
- Share it on social media and connect with other artists
Conclusion
Creating your own Luffy wanted poster drawing is a fun and rewarding project for any One Piece fan. By following these steps and tips, you can create a high-quality drawing that captures the spirit of the original poster. Whether you’re a seasoned artist or a beginner, this guide will help you create a Luffy wanted poster drawing that you can be proud of. So, grab your pencils, gather your materials, and get started today!
Remember to pay attention to the details, use good references, and most importantly, have fun with the process. Your finished Luffy wanted poster drawing will be a testament to your artistic skills and your love for the world of One Piece. Happy drawing!
[See also: One Piece Fan Art Guide]
[See also: How to Draw Anime Characters]
