
How to Share a List on Amazon: A Comprehensive Guide
Amazon’s list feature is a powerful tool for organizing your shopping, creating wishlists, or collaborating on gift ideas. Knowing how to share a list on Amazon effectively enhances this utility, allowing you to easily coordinate with friends, family, or colleagues. This guide provides a step-by-step walkthrough on how to share a list on Amazon, covering various scenarios and offering tips for optimal list management. Learning to share a list on Amazon is a simple process that can significantly streamline your online shopping experience.
Understanding Amazon Lists: Wish Lists, Shopping Lists, and Idea Lists
Before diving into the sharing process, it’s crucial to understand the different types of lists Amazon offers. Each serves a unique purpose:
- Wish List: Primarily used for creating a list of items you desire, often for birthdays, holidays, or other special occasions.
- Shopping List: Designed for managing your regular grocery or household item purchases.
- Idea List: A more general list for saving interesting products or potential future purchases.
The steps to share a list on Amazon are generally the same across these list types, but understanding the purpose of each list can help you tailor your sharing strategy. For example, a wish list might be shared with family, while a shopping list might be shared with a household member.
Step-by-Step Guide: How to Share a List on Amazon
The process to share a list on Amazon is straightforward. Follow these steps:
Step 1: Access Your Lists
First, navigate to your Amazon account. Hover over “Account & Lists” in the top right corner of the Amazon homepage. A drop-down menu will appear. Click on “Your Lists.” This will take you to a page where all your created lists are displayed.
Step 2: Select the List You Want to Share
Browse through your lists and click on the specific list you want to share a list on Amazon. Make sure you are selecting the correct list, as sharing the wrong list can lead to confusion.
Step 3: Locate the “Share” Option
Once you’re on the list page, look for the “Share” button. It’s typically located near the top of the page, often next to options like “Edit list” or “Print.” The exact location may vary slightly depending on your device and browser, but it’s usually easily identifiable. Click on the “Share” button to proceed.
Step 4: Choose Your Sharing Method
Clicking the “Share” button will open a pop-up window or display a set of options for sharing. Amazon offers several ways to share a list on Amazon:
- Copy Link: This option generates a unique URL that you can copy and paste into an email, text message, or any other messaging platform.
- Email: This option allows you to directly email the list to someone. You’ll typically need to enter the recipient’s email address and can add a personalized message.
- Social Media: In some cases, Amazon may offer options to share directly to social media platforms like Facebook or Twitter.
Select the sharing method that best suits your needs. For most situations, copying the link is the most versatile option.
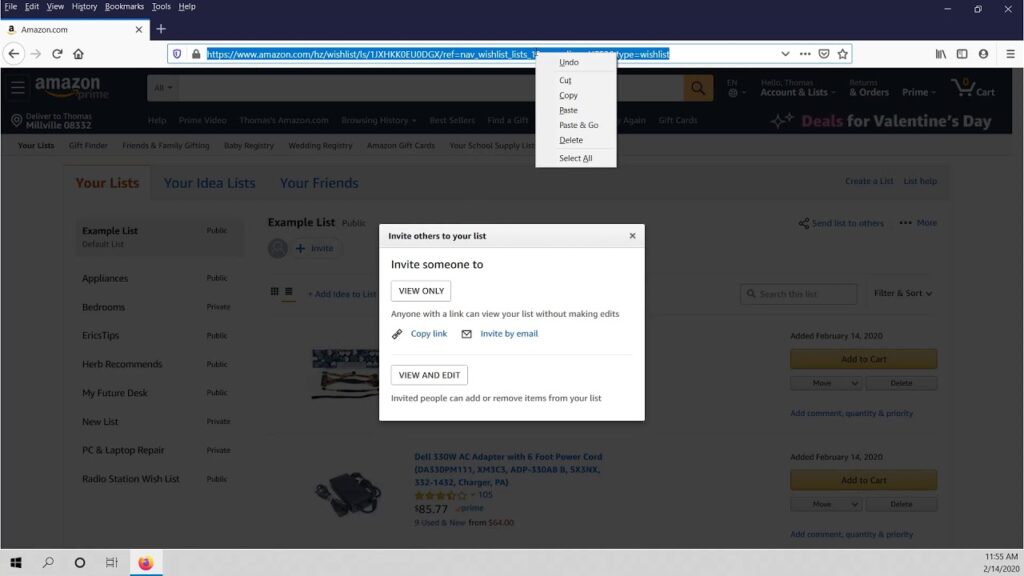
Step 5: Set List Permissions (Important!)
Before sharing, it’s crucial to configure the list permissions. This determines who can view or edit your list. Amazon typically offers two primary permission settings:
- View Only: This setting allows recipients to view the list but not make any changes. This is ideal for sharing wishlists or idea lists where you don’t want others to modify the contents.
- View and Edit: This setting allows recipients to view the list and add or remove items. This is useful for collaborating on shopping lists or planning group gifts.
Carefully consider the purpose of your list and choose the appropriate permission setting before you share a list on Amazon. Accidentally granting edit access to a personal wishlist could lead to unwanted modifications.
Step 6: Share the List
Once you’ve selected your sharing method and set the permissions, you can finally share a list on Amazon. If you chose to copy the link, paste it into your desired messaging platform and send it to your intended recipients. If you chose email, enter the recipient’s email address and send the message. If you selected a social media option, follow the prompts to share the list on your chosen platform.
Tips for Managing and Sharing Amazon Lists
Here are some additional tips to optimize your use of Amazon lists and ensure a smooth sharing experience:
- Keep Your Lists Organized: Regularly review and update your lists to remove outdated items or add new ones. This ensures that the information you share a list on Amazon is always accurate and relevant.
- Use Descriptive List Names: Give your lists clear and descriptive names so that recipients know exactly what the list is for. For example, instead of “List 1,” use “Sarah’s Birthday Wish List” or “Household Grocery List.”
- Add Comments to Items: You can add comments to individual items on your list to provide additional details or context. This can be especially helpful when collaborating on shopping lists or specifying preferences on a wish list.
- Regularly Check Permissions: Periodically review the permissions settings of your shared lists to ensure that they are still appropriate. If you no longer want someone to have edit access, you can easily change the permissions.
- Communicate Clearly: When you share a list on Amazon, be sure to communicate clearly with the recipients about the purpose of the list and any specific instructions or preferences.
Troubleshooting Common Sharing Issues
Sometimes, you might encounter issues when trying to share a list on Amazon. Here are some common problems and their solutions:
- Link Not Working: If the shared link isn’t working, double-check that you copied the entire link correctly. Also, ensure that the recipient has an Amazon account and is logged in.
- Permissions Issues: If recipients are having trouble viewing or editing the list, verify that the permissions settings are correctly configured.
- List Not Visible: If a recipient can’t see the list, make sure you’ve shared the correct list and that they’re logged into the correct Amazon account. Sometimes, people have multiple accounts and might be logged into the wrong one.
The Benefits of Sharing Amazon Lists
Learning to share a list on Amazon offers several benefits, including:
- Streamlined Gift-Giving: Make it easier for friends and family to buy you gifts you actually want.
- Collaborative Shopping: Simplify grocery shopping or household supply purchases with shared lists.
- Idea Organization: Keep track of potential future purchases and easily share them with others for feedback.
- Reduced Duplication: Avoid duplicate purchases when planning group events or buying gifts.
Conclusion
Knowing how to share a list on Amazon is a valuable skill that can enhance your online shopping experience and simplify coordination with others. By following the steps outlined in this guide and utilizing the tips provided, you can effectively manage and share a list on Amazon for various purposes. Remember to pay close attention to list permissions to ensure that your lists are shared appropriately. So go ahead, share a list on Amazon and start enjoying the benefits of organized and collaborative shopping!
[See also: Amazon Prime Benefits Explained]
[See also: How to Find Amazon Coupons]
[See also: Tips for Safe Online Shopping on Amazon]
