How to Shrink Screen Size: A Comprehensive Guide for All Devices
In today’s digital age, adjusting your screen size is a common task, whether you’re dealing with oversized icons, text that’s too large, or simply trying to optimize your workspace. Knowing how to shrink screen size can significantly improve your user experience across various devices. This guide provides a comprehensive overview of methods to reduce your screen display on Windows, macOS, smartphones, and even web browsers, ensuring you can tailor your visual experience to your specific needs. Let’s dive into the details of how to shrink screen size effectively. We’ll cover different operating systems and devices to ensure you can handle any situation where your screen display is too large.
Understanding Why You Might Need to Shrink Screen Size
Before we delve into the methods, let’s understand why you might need to adjust your screen size. Common reasons include:
- Improved Visibility: On smaller screens, shrinking the screen size can make more content visible at once.
- Accessibility: Some users find smaller text and icons easier to manage, especially with visual impairments.
- Multitasking: Reducing screen size allows you to fit more windows on your screen, enhancing multitasking capabilities.
- Resolution Issues: Sometimes, incorrect resolution settings can make elements appear too large, necessitating a size adjustment.
Shrinking Screen Size on Windows
Windows offers several ways to adjust the screen size, catering to different user preferences and technical expertise.
Using Display Settings
The simplest method involves using the built-in Display Settings:
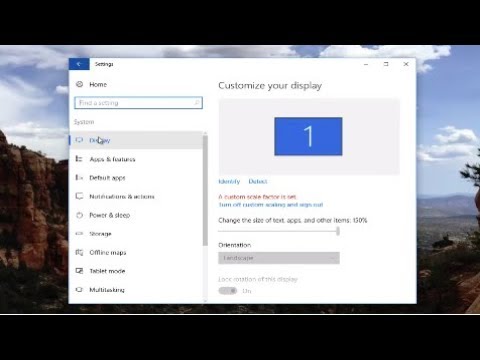
- Access Display Settings: Right-click on your desktop and select “Display settings.”
- Adjust Scale and Layout: Under “Scale & layout,” you’ll find a dropdown menu labeled “Change the size of text, apps, and other items.” Reducing this percentage will effectively shrink the screen size. For example, changing from 125% to 100% will make everything smaller.
- Resolution Settings: Further down, you can also adjust the screen resolution. Lowering the resolution can also make elements appear larger, so increasing it can help shrink screen size.
- Apply Changes: After making your adjustments, click “Apply” to save the changes.
Using Keyboard Shortcuts
For quick adjustments, keyboard shortcuts can be incredibly useful:
- Zooming In/Out: Press the Windows key and the plus (+) key to open Magnifier. Use Ctrl + Alt + Mouse Wheel Up/Down to zoom in or out, effectively changing the visible screen size.
Adjusting DPI Settings
For more advanced control, you can adjust the DPI (dots per inch) settings:
- Access Control Panel: Open the Control Panel and navigate to “Appearance and Personalization” and then “Display.”
- Set Custom Scaling Level: Click on “Set custom scaling level.” Here, you can enter a specific percentage to fine-tune the screen size. A lower percentage will shrink screen size.
- Apply and Restart: Apply the changes and restart your computer for the settings to take full effect.
Shrinking Screen Size on macOS
macOS provides intuitive options to manage screen size, ensuring a seamless user experience.
Using Display Preferences
The primary method involves using System Preferences:
- Access System Preferences: Click the Apple menu in the top-left corner and select “System Preferences.”
- Open Displays: Click on “Displays.”
- Adjust Resolution: Under the “Display” tab, you can choose from various resolutions. Selecting a higher resolution will shrink screen size, allowing more content to fit on the screen.
- Scaled Option: Choose the “Scaled” option to see a list of available resolutions. Select the resolution that best suits your needs.
Using Zoom Features
macOS also offers built-in zoom features for accessibility:
- Enable Zoom: Go to “System Preferences” > “Accessibility” > “Zoom.” Check the box next to “Use keyboard shortcuts to zoom.”
- Zoom In/Out: Use Option + Command + Plus (+) or Minus (-) keys to zoom in or out, effectively changing the visible screen size.
Shrinking Screen Size on Smartphones (Android and iOS)
Adjusting screen size on smartphones involves changing display settings to optimize text and icon sizes.
Android
- Access Settings: Open the Settings app on your Android device.
- Navigate to Display: Scroll down and tap on “Display.”
- Font Size and Display Size: Look for options like “Font size” and “Display size.” Adjusting these settings will affect the size of text and icons. Reducing the display size will shrink screen size, allowing more content to be displayed.
- Apply Changes: Save your changes and observe the new display.
iOS (iPhone/iPad)
- Access Settings: Open the Settings app on your iOS device.
- Navigate to Display & Brightness: Scroll down and tap on “Display & Brightness.”
- Text Size: Tap on “Text Size” to adjust the text size slider.
- Display Zoom: Go back to “Display & Brightness” and tap on “View” under “Display Zoom.” Choose “Standard” for a smaller display size, which will shrink screen size.
- Apply Changes: Select “Set” to apply the changes, and your device may restart.
Shrinking Screen Size in Web Browsers
Web browsers also offer options to zoom in or out on web pages, effectively changing the visible screen size of the content.
Using Keyboard Shortcuts
- Zoom In/Out: Press Ctrl + Plus (+) to zoom in and Ctrl + Minus (-) to zoom out on Windows. On macOS, use Command + Plus (+) and Command + Minus (-).
- Reset Zoom: Press Ctrl + 0 (zero) on Windows or Command + 0 (zero) on macOS to reset the zoom level to the default 100%.
Using Browser Menu
- Access Menu: Click on the browser’s menu icon (usually three dots or lines in the top-right corner).
- Adjust Zoom: Look for the “Zoom” option and use the plus (+) and minus (-) buttons to adjust the zoom level.
Troubleshooting Common Issues
Sometimes, adjusting screen size can lead to unexpected issues. Here are some common problems and their solutions:
- Blurry Text: If text appears blurry after adjusting the screen size, try adjusting the ClearType settings in Windows or Font Smoothing in macOS.
- Incorrect Resolution: Ensure that your screen resolution is set to the recommended value for your monitor.
- Driver Issues: Outdated or corrupted graphics drivers can cause display problems. Update your graphics drivers to the latest version.
- Compatibility Problems: Some applications may not scale well with certain display settings. Try adjusting compatibility settings for these applications.
The Impact of Screen Size on User Experience
Understanding how to shrink screen size is not just about making things smaller; it’s about optimizing your overall user experience. A well-adjusted screen size can improve readability, reduce eye strain, and enhance productivity. Consider your specific needs and preferences when making adjustments. Experiment with different settings to find the perfect balance that works for you.
Conclusion
Knowing how to shrink screen size is a valuable skill in today’s digital world. Whether you’re using a Windows PC, a Mac, a smartphone, or a web browser, the methods outlined in this guide will help you tailor your visual experience to your liking. By understanding the various options and troubleshooting common issues, you can ensure that your screen size is always optimized for your needs. Remember to regularly assess your display settings to maintain a comfortable and productive digital environment. Properly adjusting the screen size can significantly enhance your daily interactions with technology, making tasks easier and more enjoyable. Learning how to shrink screen size can also be beneficial when giving presentations or sharing your screen, ensuring that everyone can easily view the content being displayed. So, take the time to explore these settings and find the perfect screen size for your specific requirements. Mastering how to shrink screen size is a small adjustment that can make a big difference in your digital life.
[See also: Adjusting Screen Resolution for Optimal Viewing]
[See also: Troubleshooting Display Issues on Windows]
[See also: Improving Accessibility on macOS]
