
Mastering Your Chromebook’s Audio Settings: A Comprehensive Guide
Chromebooks have become increasingly popular for their simplicity, speed, and security. Whether you’re using it for work, school, or entertainment, understanding how to manage your audio settings Chromebook is crucial for a seamless experience. This guide will walk you through everything you need to know about adjusting and optimizing your Chromebook’s audio, ensuring you get the best possible sound quality for any situation.
Understanding the Basics of Chromebook Audio
Before diving into the specifics, let’s cover the fundamentals. Chromebooks, like any other computer, have a built-in sound card and speakers. They also support external audio devices such as headphones, microphones, and Bluetooth speakers. The audio settings Chromebook allow you to control volume levels, choose input and output devices, and tweak other parameters to suit your preferences.
Accessing the Audio Settings
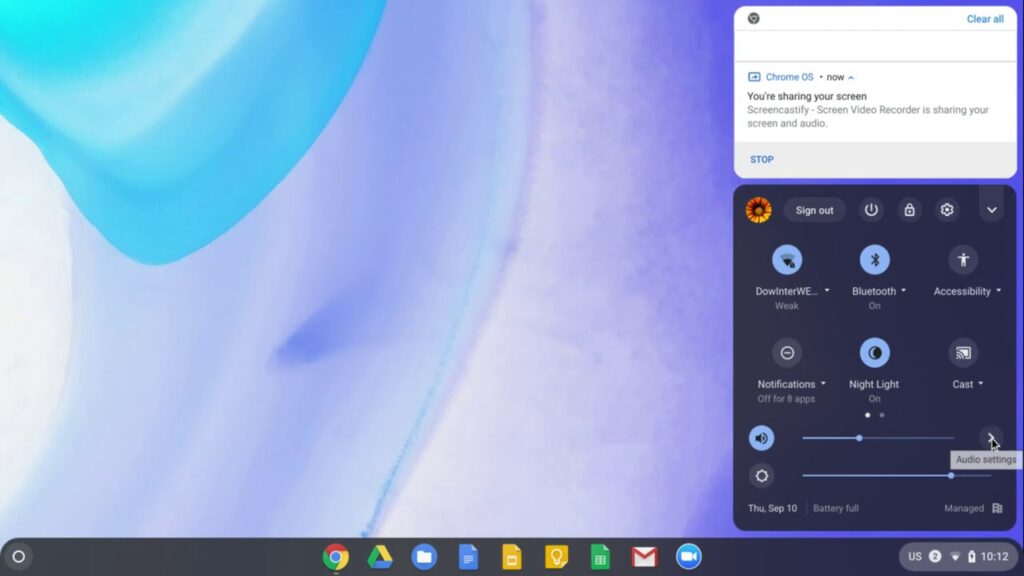
There are several ways to access the audio settings Chromebook. Here’s a breakdown of the most common methods:
- Quick Settings Panel: The easiest way is through the Quick Settings panel. Click on the clock in the bottom-right corner of your screen. This will open a panel with various options, including volume control. You can adjust the volume using the slider directly or click on the gear icon to access the full settings menu.
- Settings Menu: Alternatively, you can go to the main Settings menu. Click on the Launcher icon (the circle in the bottom-left corner), search for “Settings,” and open the app. Then, navigate to “Device” and then “Audio.”
- Keyboard Shortcuts: Chromebooks also have dedicated keyboard shortcuts for volume control. Look for the volume up, volume down, and mute keys on your keyboard. These keys usually have speaker icons.
Adjusting Volume Levels
The most basic audio settings Chromebook involve adjusting the volume. As mentioned earlier, you can use the Quick Settings panel or keyboard shortcuts for this. However, the Settings menu provides more granular control.
Input and Output Devices
Within the audio settings Chromebook, you’ll find options to select your preferred input and output devices. This is particularly useful when you have multiple audio devices connected, such as headphones and a microphone.
- Output Devices: This section lets you choose where the sound comes from. Options might include the built-in speakers, headphones, or a Bluetooth speaker.
- Input Devices: This section allows you to select the microphone you want to use. This could be the built-in microphone, a headset microphone, or an external USB microphone.
Ensuring the correct devices are selected is crucial for both listening and recording. For example, if you’re in a video call, you’ll want to make sure your microphone is properly selected so others can hear you clearly. Similarly, if you want to listen to music privately, selecting headphones as the output device is essential.
Troubleshooting Common Audio Issues
Sometimes, you might encounter audio problems on your Chromebook. Here are some common issues and how to troubleshoot them using the audio settings Chromebook:
No Sound
If you’re not hearing any sound, start by checking the volume level. Make sure it’s not muted and that the volume is turned up. Next, verify that the correct output device is selected. If you’re using headphones, try unplugging and plugging them back in. If the problem persists, try restarting your Chromebook.
Distorted Sound
Distorted sound can be caused by several factors. First, check the volume level. If it’s too high, it can cause distortion. Try lowering the volume to see if that resolves the issue. If you’re using external speakers, make sure they are properly connected and powered on. Also, check the audio source. A low-quality audio file can also result in distorted sound. Trying a different audio file can help isolate the problem.
Microphone Not Working
If your microphone isn’t working, ensure that it’s properly connected and selected as the input device. Check the microphone volume level in the audio settings Chromebook. Some applications also have their own microphone settings, so make sure the correct microphone is selected there as well. You can also try testing your microphone using the built-in sound recorder app to ensure it’s functioning correctly.
Bluetooth Audio Problems
Bluetooth audio issues can be frustrating. If you’re having trouble connecting a Bluetooth speaker or headphones, make sure Bluetooth is enabled on your Chromebook. Go to Settings > Bluetooth and turn it on if it’s off. Pair your Bluetooth device with your Chromebook. If the device is already paired, try disconnecting and reconnecting it. Sometimes, forgetting the device and re-pairing it can resolve connectivity issues. [See also: Chromebook Bluetooth Troubleshooting Guide]
Advanced Audio Settings and Features
Beyond the basic adjustments, Chromebooks offer some advanced audio settings Chromebook that can further enhance your audio experience.
Accessibility Features
Chromebooks have built-in accessibility features to help users with hearing impairments. These features include:
- Mono Audio: This feature combines the left and right audio channels into a single channel, making it easier for people with hearing loss in one ear to hear all the sounds.
- ChromeVox: While primarily a screen reader, ChromeVox can also provide audio feedback for various actions, making it easier for visually impaired users to navigate the Chromebook.
Using External Audio Interfaces
For more advanced audio needs, such as recording music or podcasts, you can use an external audio interface. These devices provide higher-quality audio input and output compared to the built-in sound card. To use an external audio interface, simply connect it to your Chromebook via USB. The Chromebook should automatically recognize the device. You may need to adjust the input and output settings in the audio settings Chromebook to use the audio interface as the default audio device.
Audio Extensions and Apps
The Chrome Web Store offers a variety of audio extensions and apps that can enhance your audio experience. These extensions can provide features such as:
- Equalizers: Allow you to customize the sound frequencies to your liking.
- Volume Boosters: Increase the volume beyond the maximum level allowed by the system.
- Audio Recorders: Provide advanced recording features.
- Noise Cancellation: Reduce background noise during calls and recordings.
Explore the Chrome Web Store to find the audio extensions and apps that best suit your needs. Be sure to read reviews and check the permissions requested by the extensions before installing them.
Optimizing Audio for Different Scenarios
The ideal audio settings Chromebook can vary depending on the situation. Here are some tips for optimizing your audio for different scenarios:
Video Conferencing
For video conferencing, it’s crucial to have a clear microphone and good sound quality. Use a headset with a built-in microphone for the best results. Adjust the microphone volume to ensure your voice is clear and not too loud or too soft. Enable noise cancellation if available to reduce background noise. [See also: Best Microphones for Chromebook Video Conferencing]. Make sure you test your audio setup before the meeting to avoid any surprises.
Listening to Music
When listening to music, choose the output device that provides the best sound quality. Headphones or external speakers are usually better than the built-in speakers. Use an equalizer to customize the sound frequencies to your liking. Experiment with different settings to find the sound that you enjoy the most.
Watching Movies
For watching movies, consider using external speakers or headphones for a more immersive experience. Adjust the volume to a comfortable level. If you’re watching a movie with subtitles, make sure the audio is clear enough to hear the dialogue without having to turn the volume up too high.
Keeping Your Audio Drivers Up to Date
While Chromebooks handle most updates automatically, it’s still a good practice to ensure your system is up to date. This includes audio drivers. Keeping your system updated can resolve many compatibility issues and improve audio performance. Chromebooks automatically update in the background, so you typically don’t need to worry about manually updating drivers. However, periodically checking for updates can ensure you have the latest improvements.
Conclusion
Mastering your audio settings Chromebook is essential for getting the most out of your device. By understanding the basics, troubleshooting common issues, and optimizing your audio for different scenarios, you can ensure a seamless and enjoyable audio experience. Whether you’re listening to music, participating in video conferences, or recording audio, taking the time to adjust your audio settings Chromebook will make a significant difference. So, dive in, experiment with the settings, and find what works best for you. Happy listening!
