Unlocking Power: A Comprehensive Guide to Hollow Knight Charms Names and Effects
Hollow Knight, the critically acclaimed metroidvania from Team Cherry, is renowned for its intricate world, challenging gameplay, and deep lore. A core component of the game’s customization and combat strategy lies in its diverse collection of charms. These equippable items grant the Knight a wide array of abilities, from increased strength and mobility to enhanced healing and defensive capabilities. Understanding the Hollow Knight charms names and their corresponding effects is crucial for mastering the game and tailoring your playstyle.
This guide provides a detailed overview of all Hollow Knight charms names, their locations, and their effects, equipping you with the knowledge to optimize your build and conquer Hallownest. We’ll delve into the specifics of each charm, exploring their synergies and optimal usage scenarios. Whether you’re a seasoned veteran or a new player just beginning your adventure, this guide will serve as your definitive resource for understanding the power of Hollow Knight charms names.
Understanding the Charm System in Hollow Knight
Before diving into the individual charms, it’s essential to grasp the fundamentals of the charm system. Charms are equipped at benches scattered throughout Hallownest. Each charm occupies a certain number of notches, and the Knight has a limited number of notches available. This constraint forces players to make strategic decisions about which charms to equip, balancing their desired abilities with the available space. Certain charms synergize well with others, creating powerful combinations that can significantly enhance the Knight’s capabilities. Understanding these synergies is a key aspect of mastering the charm system.
Charm Notches: A Limited Resource
The Knight starts with a limited number of charm notches. Additional notches can be acquired by finding and purchasing them from specific vendors, such as Sly in Dirtmouth. Managing your charm notches effectively is paramount to creating a viable build. Consider which abilities are most crucial for your playstyle and prioritize charms that offer the greatest benefit for their notch cost.
Charm Synergies: Unleashing Potential
Experimentation is key to discovering powerful charm synergies. Some charms directly complement each other, while others create unexpected combinations that can significantly alter your gameplay experience. For example, combining Quick Focus with Shape of Unn allows you to heal while moving, making you much harder to hit during tense combat encounters. Exploring these synergies is a rewarding aspect of Hollow Knight, encouraging players to think creatively and adapt to different challenges.
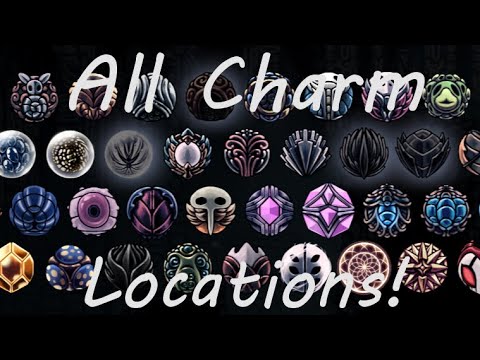
A Comprehensive List of Hollow Knight Charms Names and Effects
The following list details each of the Hollow Knight charms names, their effects, and their locations within the game. Note that some charm locations may require specific abilities or progression milestones to access.
- Gathering Swarm: Automatically gathers Geo (currency) from fallen enemies. Location: Forgotten Crossroads, Sly’s shop.
- Stalwart Shell: Increases invincibility frames after taking damage. Location: Forgotten Crossroads, behind a breakable wall near the False Knight arena.
- Soul Catcher: Increases the amount of Soul gained from striking enemies. Location: Forgotten Crossroads, inside the Ancestral Mound.
- Soul Eater: Significantly increases the amount of Soul gained from striking enemies, but requires more notches. Location: Resting Grounds, inside the Seer’s hut after obtaining the Dream Nail.
- Shaman Stone: Increases the damage and size of spells. Location: Forgotten Crossroads, purchased from Salubra.
- Spell Twister: Reduces the Soul cost of spells. Location: City of Tears, in a secret room near the Soul Master arena.
- Steady Body: Prevents knockback when striking enemies. Location: Forgotten Crossroads, purchased from Sly.
- Heavy Blow: Increases knockback when striking enemies. Location: City of Tears, purchased from Leg Eater.
- Quick Focus: Increases the speed of healing. Location: Forgotten Crossroads, purchased from Salubra.
- Deep Focus: Heals more health per use, but takes longer to focus. Location: Crystal Peak, inside a hidden room.
- Lifeblood Heart: Grants additional Lifeblood masks upon resting. Location: Abyss, requires descending into the Abyss.
- Lifeblood Core: Grants even more Lifeblood masks upon resting, but requires more notches. Location: Abyss, requires descending further into the Abyss and navigating a challenging platforming section.
- Defender’s Crest: Emits a foul odor that damages nearby enemies. Location: Royal Waterways, obtained from Dung Defender.
- Glowing Womb: Summons hatchlings that attack enemies, consuming Soul. Location: Forgotten Crossroads, in a hidden room near the False Knight arena.
- Quick Slash: Increases attack speed. Location: Kingdom’s Edge, inside a secret room.
- Longnail: Increases nail range. Location: Forgotten Crossroads, purchased from Sly.
- Mark of Pride: Further increases nail range, but requires more notches. Location: Queen’s Gardens, inside a hidden room.
- Fury of the Fallen: Greatly increases attack power when at one health. Location: Resting Grounds, near the Dream Nail location.
- Thorns of Agony: Deals damage to nearby enemies after taking damage. Location: Greenpath, near the Hunter’s Journal entry for the Moss Knight.
- Spore Shroom: Emits a cloud of spores when focusing. Location: Fungal Wastes, inside a mushroom-filled area.
- Sharp Shadow: Increases the damage and length of the Shade Cloak dash. Location: Deepnest, obtained after defeating the No Eyes boss.
- Shape of Unn: Allows the Knight to move while focusing. Location: Greenpath, inside a hidden room near the Unn statue.
- Nailmaster’s Glory: Reduces the charge time of Nail Arts. Location: Resting Grounds, obtained after completing all three Nailmaster trials.
- Jonis Blessing: Converts all health into Lifeblood masks. Location: Ancient Basin, requires descending into the Ancient Basin.
- Kingsoul: Slowly generates Soul over time. Location: Obtained by equipping the White Fragment charms, found in Queen’s Gardens and Ancient Basin, and then visiting the Birthplace in the Abyss.
- Void Heart: Transforms Kingsoul into a more powerful version with unique effects. Location: Obtained by completing the White Palace and descending into the Abyss. This charm changes the ending of the game.
- Grubsong: Generates Soul when taking damage. Location: Forgotten Crossroads, obtained after rescuing a certain number of Grubs.
- Grubberfly’s Elegy: Fires a projectile when at full health. Location: Forgotten Crossroads, obtained after rescuing all Grubs.
- Weaversong: Summons weaverlings that attack enemies. Location: Deepnest, inside a weaver’s den.
- Sprintmaster: Increases movement speed. Location: Forgotten Crossroads, purchased from Sly.
- Dream Wielder: Increases the Dream Nail’s Soul gain and charge speed. Location: Resting Grounds, obtained from the Seer after collecting a certain amount of Essence.
- Dreamshield: Summons a shield that protects the Knight from projectiles. Location: Resting Grounds, near the Dream Nail location.
Strategic Charm Combinations for Enhanced Gameplay
The true power of the charm system lies in its potential for creating strategic combinations. Here are a few examples of effective charm builds:
- The Spellcaster: Shaman Stone, Spell Twister, Soul Catcher, Soul Eater. This build maximizes spell damage and efficiency, allowing you to rely heavily on spells for both offense and defense.
- The Agile Warrior: Quick Slash, Mark of Pride, Steady Body. This build focuses on maximizing nail damage output and control, allowing you to quickly and effectively dispatch enemies in close combat.
- The Survivalist: Quick Focus, Shape of Unn, Stalwart Shell. This build prioritizes survivability and healing, making you more resilient to damage and allowing you to recover quickly in challenging situations.
Tips for Choosing the Right Charms
Selecting the right charms for your playstyle and the challenges you face is crucial for success in Hollow Knight. Consider the following factors when choosing your charms:
- Your Playstyle: Do you prefer to focus on melee combat, spellcasting, or a combination of both? Choose charms that complement your preferred playstyle.
- The Encounter: Are you facing a boss that relies heavily on projectiles? Consider equipping Dreamshield or charms that increase your invincibility frames. Are you fighting a swarm of enemies? Consider charms that deal area-of-effect damage.
- Your Resources: How many charm notches do you have available? Prioritize charms that offer the greatest benefit for their notch cost.
Conclusion: Mastering the Power of Hollow Knight Charms Names
The charm system in Hollow Knight is a deep and rewarding aspect of the game. By understanding the Hollow Knight charms names, their effects, and their potential synergies, you can significantly enhance your gameplay experience and overcome even the most challenging obstacles. Experiment with different charm combinations, adapt your build to different situations, and unlock the true potential of the Knight. Remember that knowing all Hollow Knight charms names is just the first step; mastering their application is what truly matters. Happy hunting, and may your journey through Hallownest be filled with success!
Understanding each of the Hollow Knight charms names and their function is vital to success. Don’t be afraid to experiment with different combinations to find what works best for you. The Hollow Knight charms names are more than just labels; they represent the diverse and powerful abilities at your disposal. Learning the Hollow Knight charms names is a cornerstone of mastering the game.
Remember that the best charm build is the one that suits your individual playstyle. The Hollow Knight charms names represent a vast array of options, so explore them all and find what works best for you. The Hollow Knight charms names will become second nature as you progress through the game. Mastering the Hollow Knight charms names and their effects is key to conquering Hallownest. Good luck on your journey!
[See also: Hollow Knight Boss Guide]
[See also: Hollow Knight Map Guide]
[See also: Hollow Knight Lore Explained]
